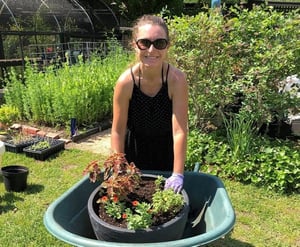
Amy Whitney loves plants, especially the ones she can eat! She is a trained horticulturist who documents her adventures in gardening and provides experience- and research-based advice for home gardeners.
Growing microgreens and baby greens is an easy and fast way to produce your own food in a small space. Harvest the plants while they have only a few leaves and eat them very soon after harvest, while they are fresh, flavorful and full of nutrients.
Microgreens, Baby Greens, Sprouts – What's the Difference?
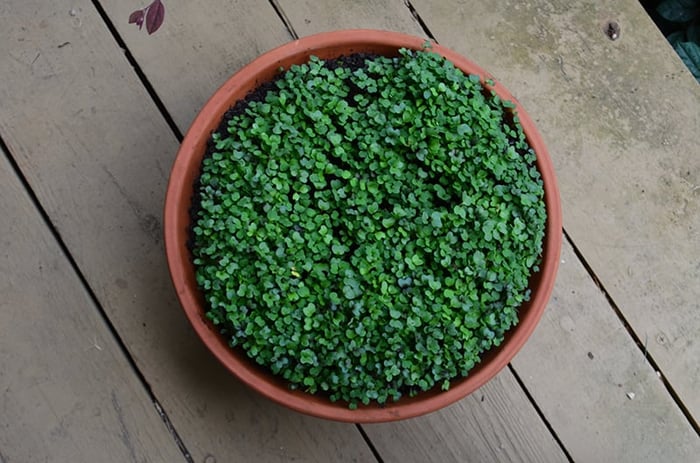
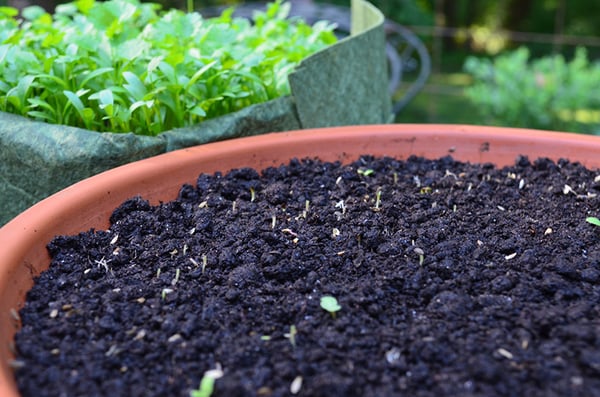
Salad mix microgreens (including broccoli, kale, kohlrabi, arugula, red acre cabbage, and cauliflower) about ten days after planting.
Sprouts are ready to be eaten very soon after the seeds open - usually just 2-4 days after little plants have unfolded from the seeds, but before the first leaves have fully expanded. For most kinds of sprouts, you eat the entire plant – leaf, stem, and root. These tiny plants are fun to grow and good to eat, but growing them is a different experience. There is no soil or planting medium to anchor the roots. At my house, we grow sprouts in jars in our kitchen, with water as the only addition.
Microgreens and baby greens are planted on a growing medium that will anchor the roots, and they grow for a longer time than sprouts.
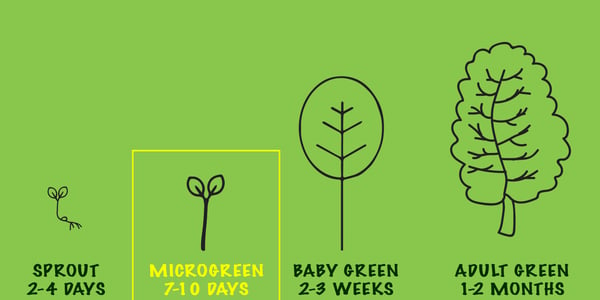
Microgreens have at least one more leaf than sprouts before you harvest them. Typically, within 7-10 days, the microgreens may be two or three inches tall and are ready to be picked.
Baby greens need even longer to grow. Depending on the variety of greens it is usually 2-3 weeks. You will wait for a few more leaves and for the plants to be four or more inches tall before the crop is ready.
Reasons to Grow Microgreens
If you have never grown microgreens, there are several good reasons to try this kind of mini-gardening:
- Packed full of nutrients
- Short time to harvest
- A good introduction to gardening
- Growing cool season crops in summer
- It's a crop that works in shaded yards
I'll explain each of those points.
Packed full of nutrients
These tiny plants contain concentrated nutrients and are full of flavor, aroma, and crunch too. They provide a great splash of color to many dishes including pizza and sandwiches, and they spice up your salads. However you use them, microgreens are a healthy addition to your diet.
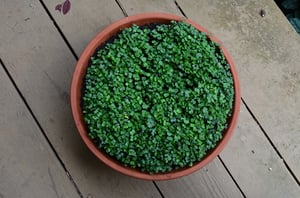
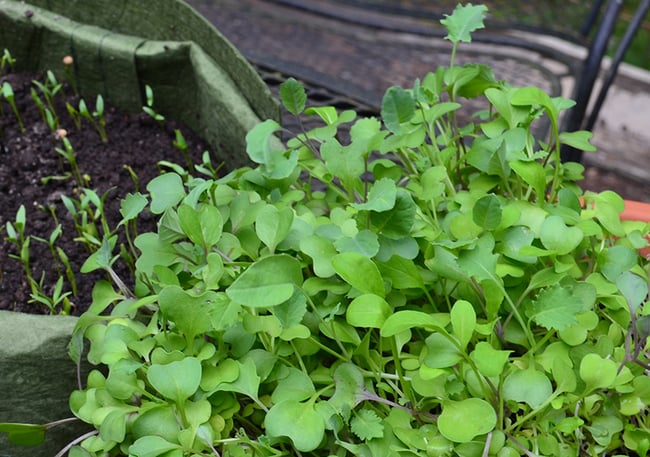 Try growing your own microgreens at home! These salad mix microgreens are the perfect size for harvesting and will be a healthy, fresh addition to my family's dinner.
Short time to harvest
You can plant seeds for microgreens and baby greens and harvest within a month or so. The quick turn-around is a great reason to sow some seeds for these greens.
A good introduction to gardening
A beginning gardener who would like to start on a small scale can use a container of microgreens to learn the rhythms of planting, tending, and harvesting.
Growing cool season crops in summer
Cool season greens like cilantro and arugula can be grown in containers in the summer as microgreens or baby greens. Outside in the main garden, these cool season greens quickly become bitter or sunburnt, or they send up flowers to complete their life cycle before you have a chance to bring them into the kitchen. Container-growing allows you to move the plants out of the hot sun, onto a shaded porch if needed. Keeping them watered is easier, too.
A crop that works in shaded yards
Most summer crops, like tomatoes or peppers, need eight hours of direct sunlight to produce well. Microgreens and baby greens will grow with much less sunlight. Filtered light, dappled through trees, is actually preferred. Indoor lighting can also be enough to produce good crops of microgreens.
Ready to Try? Here’s What You Need
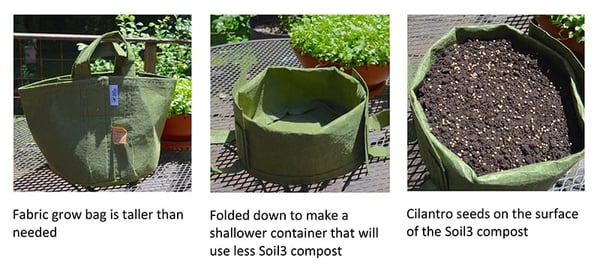
- Shallow planting container: Many kinds of shallow containers will work, including: terra cotta, plastic, glazed ceramic planters, and fabric grow-bags. If you choose a container that has porous sides, like an unglazed terra cotta bowl or a fabric grow bag, be aware that they may need to be watered every day. The bonus of a porous container is that the evaporation of water through the sides will lower the temperature of the growing medium. As a result, the roots of your microgreens will stay cooler on a hot summer day.
In the video I use a folded Root Pouch, the same kind included in the Soil³ Mini Garden Kit 2. - Tray or saucer to go under the container: A tray of some kind to set the container on will be helpful. The tray can hold water to aid in watering the container. It also can stabilize the contents of a fabric grow-bag, which will shift each time the grow-bag is moved if it is carried without a sturdy support underneath it.
- Planting medium: Soil³ Veggie Mix is an ideal planting medium for filling your container. Other options include sterile seed starting mix or fiber mats marketed specifically for growing microgreens.
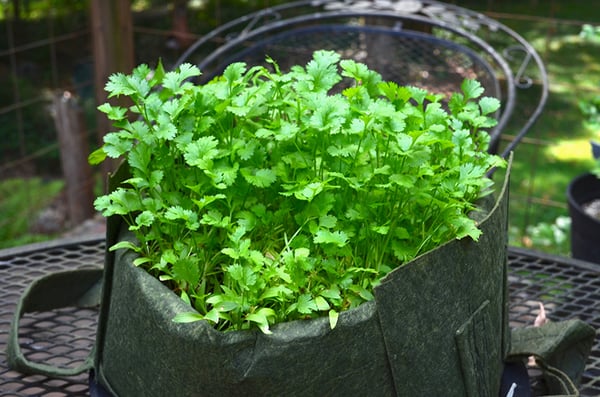 Cilantro planted in Soil³ organic compost - the perfect growing medium.
 - Seeds: Some seed companies offer packets of seeds that are labeled specifically for growing microgreens or baby greens. These packets will contain many more seeds than packets marketed for gardens, because you need a lot of seeds for the dense plantings in your containers.
- Seeds to try include: beets, cabbage, cilantro, kale, kohlrabi, mustard, radish, Swiss chard, broccoli, arugula, basil, and amaranth.
- Partly-shaded location: The midday sun in summer is too hot for cool season greens, even with the evaporative cooling provided by porous containers. Protect your greens from the hottest weather by placing them in a partially shaded location. In very hot weather, the containers may need to be brought indoors.
- Water: The best method is to give water from below (subirrigation), filling the saucer or tray that the planter sits on with water and allowing it to soak upward to the plant roots. If watering from below is not an option for your container, provide water as a gentle sprinkle from overhead.
Overhead watering that provides too much water too fast can cause problems. Initially, the seeds will wash all over the place, ruining your even distribution. Later, the newly emerged seedlings won’t have deep enough roots to hold them in place and are easily uprooted. Also, their stems may be damaged by a hard rain or heavy application of water.
Check the soil moisture in your containers daily and provide water as needed to keep your microgreens growing well.
The Basic Steps
- Identify the shady location for your microgreens.
- Find your container.
- Fill it with Soil³ Veggie Mix.
- Scatter your chosen seeds evenly over the surface – do not cover with growing medium.
- Water carefully.
- Protect your container from heavy rains for a couple of weeks, but keep it watered.
- Harvest by cutting the plants with scissors.
How many seeds to plant in one container
University of Florida Extension, in its article for commercial growers, notes that “Seeding density is difficult to recommend. Most growers indicate they want to seed as thickly as possible to maximize production, but not too thickly because crowding encourages elongated stems and increases the risk of disease.”
PennState Extension takes a less cautious view in its article for home gardeners, saying “…sprinkle lots (and I do mean lots) of seeds close together. Picture a toddler adding pink sprinkles to a cupcake.”
My own plantings of microgreens were both dense, but I distributed the larger cilantro seeds farther apart than seeds for my crop of “basic salad mix”, which included broccoli, kale, kohlrabi, arugula, red acre cabbage, and cauliflower.
When will plants be big enough to start snipping
Microgreens are ready for harvest when they have their second set of leaves open and are about 2-3 inches tall. (The first leaves are seed leaves and the second set are true leaves.) The length of time the plants need to grow to the size you want will vary. Some microgreens may be ready as soon as a few days after planting. Others will take longer to reach the desired harvest stage.
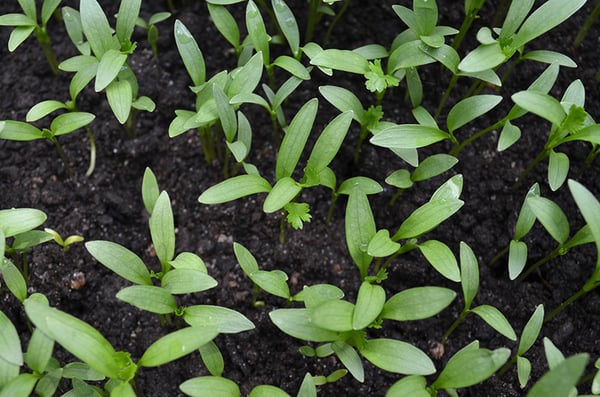
Cilantro with their first "seed leaves" (oval-shaped) and signs of their first "true leaves" appearing (delicate, lacy). These cilantro microgreens won't be ready to snip until the true leaves have fully sprouted in a few more days.
The time to harvest is based on which type of crops you are growing, in addition to environmental factors like the temperature and number of daylight hours they are exposed to. If your seeds take longer than two weeks to reach harvest stage, do not despair. My cilantro took four weeks.
Harvest with clean scissors and cut off the leaves and most of the stem. Bring your microgreens, when they are large enough, into the kitchen.
How to use them
They can be stored in the fridge for a few days – but they are best when eaten right after harvest.
Most people use microgreens fresh and raw, like sprouts. You can add them to sandwiches, tacos, salads, the tops of baked potatoes, the top of a pizza after it comes out of the oven – anywhere a pop of fresh flavor would be appreciated.
Potential problems
Slugs and snails are common pests of container plants. Not too surprisingly, they eat tiny lettuces in containers of microgreens, too. The clue in my container that explained what happened to my tiny lettuces was the silvery trails that shimmered across the surface of the Soil3. If you lose a crop to slugs or snails, consider bringing the container indoors each night to keep it out of their reach.
Snails or slugs decimated this crop of lettuce before it was ready to harvest!
Damping off is a seedling disease that can destroy a whole planting of tiny greens. If your seedlings die and you can see that they all look pinched or flattened right near the soil surface, then damping off was the cause. According to University of Minnesota Extension, damping off is more common in conditions of cool soil temperatures, high moisture, salts from too much fertilizer, and low light.
My Next Crop of Microgreens
My next crop will be arugula. When harvested as microgreens, arugula has a nutty flavor, and the young plants are milder, less spicy, than more mature plants. They are a favorite addition to salads at my house, and they are excellent on pizza.
What will you grow?
To learn more about growing microgreens, check out Joe Gardener's inspiring podcast interview with a commercial microgreen farmer and consultant.
.png?width=400&name=microgreens%20(1).png)

Did this help you out? Have any questions for clarity? Leave a comment below!