
Hi! It’s Brie the Plant Lady. This time I want to share information on one of my favorite aspects of horticulture: propagation! From sowing seeds to sticking cuttings, propagation covers all the different ways we can MAKE MORE PLANTS! And I share how I use Soil³ organic humus compost to make my propagation successful.
You may not know, but for more than a decade, I worked as a full-time plant propagator. I started as a grower of flowering annuals, moved into perennial production during my time at Plant Delights Nursery, then found my real passion as a propagator of woody ornamentals at Camellia Forest. No matter what kind of plants I am producing, there is a joy in knowing how to multiply the plants you love. And this month I want to share some tips with you, so you can be a home propagator too!
Now, if you are a visual learner, and can’t bear to read this 5,000 word blog post, check out my first Growing A Greener World Episode on this subject! In this video, we cover everything you need to know to reproduce your favorite plants - right in your back yard!
GETTING STARTED
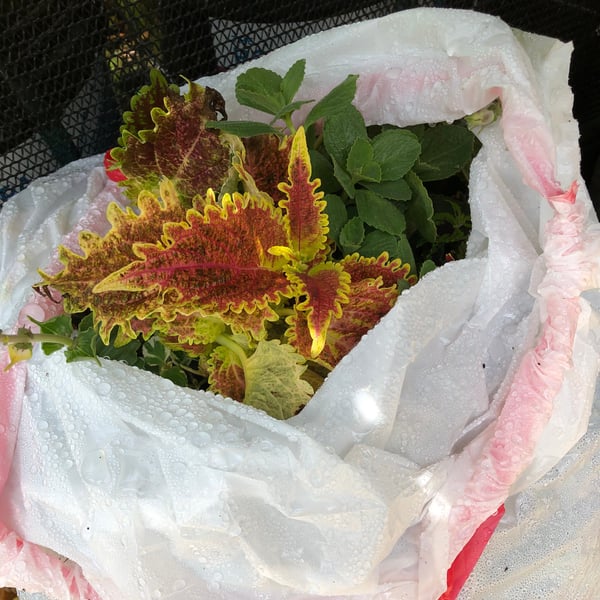
Cuttings of my favorite coleus and other plants that I will be propagating in my home mist chamber.
For me, it all started when I was in college. In fact, the only class I ever scored an A in was plant propagation. Somehow, I had an intuitive understanding about how to get a plant to root. From that class I discovered my passion, which helped lead me through my career in the green industry. Though I no longer produce plants for my living, I still grow hundreds (sometimes thousands!) of plants to use in my home garden and to share with others. In fact, I am still an active member in the International Plant Propagators Society, which I will become president of the Southern Region in October!
Home propagation is different from commercial production, so you need to make sure you are being realistic in your approach. First, identity how many plants you actually NEED. (I know this is very tough!) Then consider what plants you would like to produce. Once you have figured out those two things, you can decide HOW to approach the propagation technique.
There are two main ways that I recommend home gardeners tackle propagation: from seed and from vegetative cuttings. Both are effective and will result in you having more plants to grow. However, the conditions to be successful for each method are quite different. So let’s dive in to exactly what kind of space you need to create to be a successful home propagator.
PROPAGATING FROM SEED
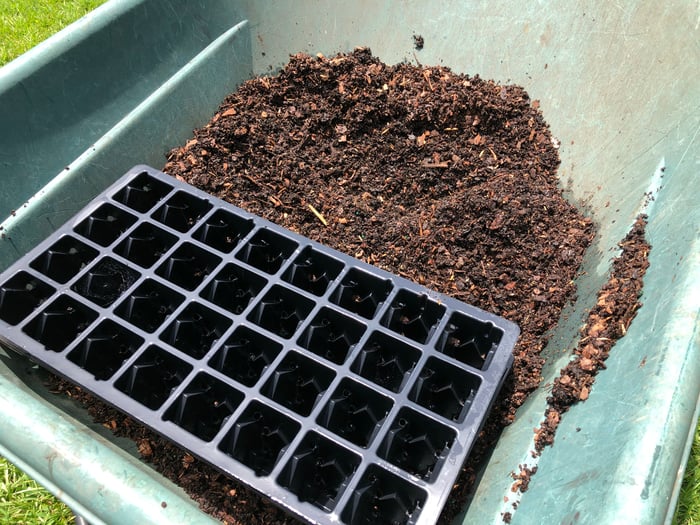
I mix my growing medium in a wheelbarrow and fill up my propagation trays in there to avoid making a mess. Just tap the trays to settle the soil - don't press it down. The roots need air space between soil particles.
Growing from seed is often the most common way for home growers to propagate plants. Seed can easily be sourced from online and catalog resources (my go-to is Baker Creek Heirloom Seed) or you can gather from your own plants. When you buy seed from a distributor they are ready to be sown - either in pots or directly into the ground. However, if you are gathering your own seed you may have to take some additional steps to get the seed to grow.
Typical “annual” plants, like vegetables or flowers such as Zinnia, can simply be sown per the instructions on the packet and will not require additional scarification or stratification to germinate. In contrast, a seed that you harvest from a plant in your garden from say, a Camellia, like the fall blooming Camellia sasanqua, will need to be treated in order to germinate.
You may notice that you have plants that “self-sow.” In the example of zinnias, they often drop seed that will germinate the following season when the cultural conditions are appropriate, namely soil temperature.
For small seeds, found on flowering annuals and perennials, that is quite literally all you need to do. When growing plants that have small seed, just store in the refrigerator and sow when you are ready. The storage reference there is important: seed prefers dark, humid conditions that are dry and cool in temperature - NOT FREEZING! Please do not store your seed in the freezer!
The same goes for a fall blooming camellia, or any other “large seeded” plant which many trees and shrubs produce. Generally, if you let a large seed drop in place, over a few months’ time the natural weather cycles will enable the seed to germinate in place, which you can then dig up and transplant or grow out in a container. Think acorns - we all deal with self-sowing acorns! (Thank you squirrels and wet winters.)
Seed Germination Needs
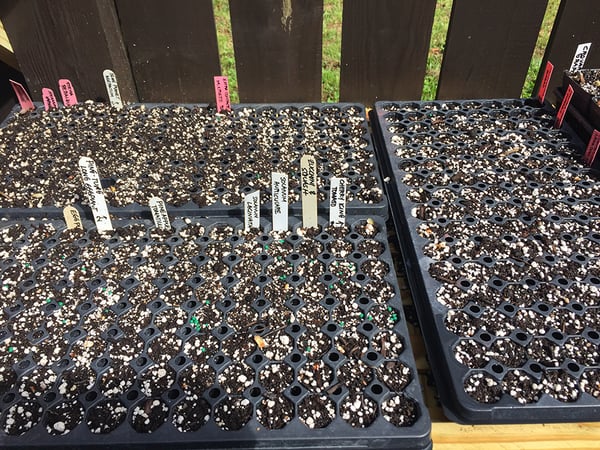
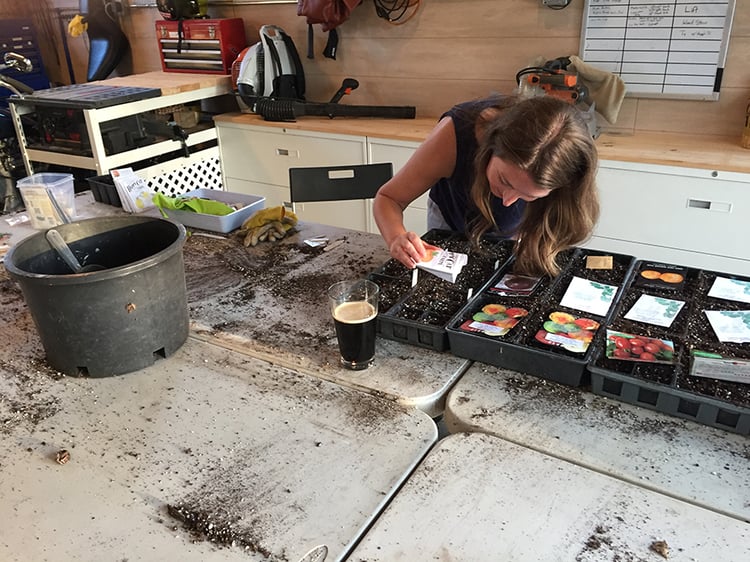
This spring my seed trays were planted full of vegetables and flowers!
The reason seed will seemingly germinate in place like that is directly related to two important things: scarification and stratification. Before you freak out about scientific terms let me explain.
Scarification – Breaching the Hard Seed Shell
Scarification is simply the breaking down of the seed coat. This can be done in a number of ways to speed up the process of germination. My go-to approach is simple: hot tap water. Fill a cup with hot tap water and drop your seed into it. Allow to soak for up to 24 hours and then sow. No, the water does not need to stay hot.
This method works 99% of the time, especially for the type of plants that home growers are trying to produce. Basically you are breaking down the seed coat by allowing the tissue to dissolve in water. This re-hydrates the seed (especially if it has been stored for a long time) and will promote germination.
Other methods of scarification involve breaking the seed coat down by using an abrasive material, like sand paper. I used to do this when working at a nursery but have NEVER had to go to these measures for my needs as a home gardener.
Stratification – Simulating Natural Conditions
Stratification is a term that relates to weather - specifically temperature fluctuations. Again, most “annuals” do not have a requirement, but trees and shrubs often do. Have you ever wondered why some plants are “hard to find” at garden centers and box stores? Or why some plants are really expensive? It is probably because that variety has a difficult stratification cycle.
You see some plants, especially varieties native to regions with colder temperatures or frequent freezing and thawing cycles, will need those conditions to stimulate germination. That can be mimicked by moving seed into the freezer for a specific time frame and then allowing to thaw - mimicking the conditions of a natural weather pattern. Unless you are really devoted, I recommend sticking to less complicated plants!
Soil for Sowing Seed
Once your seed has had the proper temperature control and seed coat disruption, you are ready to sow. This is where Soil³ compost comes into play. Choosing the right growing medium for sowing seed can be confusing - there are so many different products in the marketplace. As a professional grower, I used straight vermiculite in either communal trays or cell packs. As a home grower, I find that vermiculite dries out too fast. I am not there tending these seedlings the same way I did when it was my job! Instead, I use a 50/50 mix of potting soil and Soil³ compost.
In a wheelbarrow, I dump out a bag of potting mix - usually made from peat moss and perlite. Then I add the same amount of Soil³ and incorporate thoroughly. This is an ideal seed starting mix because it holds humidity but still allows the soil to drain. Additionally, the roots will develop better because of the large particle size of the Soil³ compost while having access to nutrients.
Update (3 years after writing this article): And now that they have their Veggie Mix potting soil, I simply use it!
I like to re-use plastic, and in the case of seed starting, I find the trays that annuals are sold in, either a 4 or 6 pack, are perfect for starting larger, single specimen plants. With smaller varieties, communal trays are an efficient way to germinate a lot of seed for transplanting later.
Just Keep Sowing
 Seed sowing is something I do constantly, so forgive me if this sounds like second nature. Basically, my advice if you are afraid, just keep sowing more seed and I promise SOMETHING will germinate. I fear the gardeners of 2019 have lost their way with the art of growing from seed, and instead choose to purchase already sprouted plants. But there are many plants that are best grown from seed directly in place because they do not transplant well. Of course, for any plant nerds out there, sometimes you have to grow a plant from seed because no one carries it!
To Fertilize or Not?
When I was a professional grower using a coated, granular, synthetic, time-release fertilizer I approached fertility very differently. Now, as an organic home gardener, I often wait to fertilize and rely on natural products like cotton seed meal and fish emulsion. In general, your soil does not need to have a “charge” (aka N-P-K) until the plant develops roots and begins to grow. If you are trying to grow a plant that may take many months to germinate (trust me there are a ton of trees that can take more than 6 months to begin to develop!) my recommendation is to not add fertilizer. When you see green leaves, use a water-soluble solution and then decide if you need to use an additional product, such as Osmacote.
Watering
By adding the Soil³ compost to your seed starting mix you will reduce your need for watering, which is great! I stash my seed trays in a more-shade-than-sun location with easy access to water. When first sown, they may only need to be watered once a week. After germination you will need to increase your watering cycle. If the plants begin to dry out regularly that is the sign that you need to repot them in a larger pot or transplant them into the ground.
PROPAGATING FROM CUTTINGS
Asexual, or clonal propagation, is my specialty! Unlike seed sowing, this is not something that you can easily do on your dining room table. Instead you will need a shady, humid environment with regular mist cycles - not something the average homeowner has.
In my twenty-year career I have grown in a lot of propagation facilities - starting with the most sophisticated at the ripe age of 19 and now using a homemade system in my backyard. The truth is, you do not need to have a fancy greenhouse to create a perfect environment for cutting production. But you do need to understand a few key aspects.
What is a Mist House?
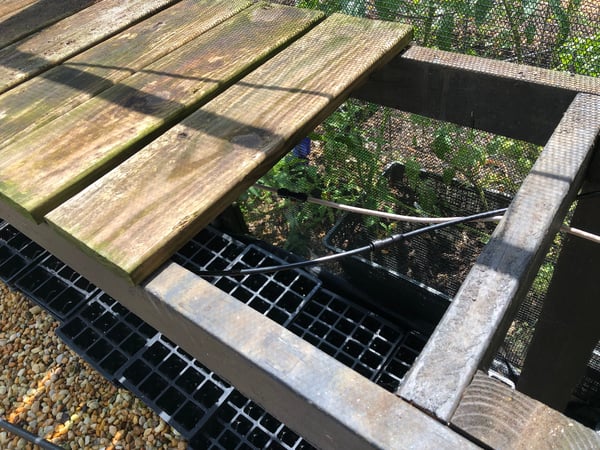
My greenhouse bench has removable boards for tall plants. Underneath is the mist hose that I use as part of my homemade mist chamber when I am busy propagating!
A mist house is simply an area designated to grow off unrooted cuttings of plants. This applies to all plants from flowering annuals and perennials to woody trees and shrubs.
The idea is simple - stick unrooted pieces of plant material into a space that has high humidity (to reduce respiration) and low light (to reduce transpiration). This location will enable the plant to survive while the cells divide, ultimately creating a root system so the plant can begin to absorb water and nutrients through its vascular system. Once rooted, you remove the plants from the mist and slowly acclimate them to your conditions by placing them in varying amounts of shade over a period of several weeks.
Obviously, this is not the sort of thing that most home owners have, and no, using a clear cover is not the same thing. In fact, those “propagation domes” are really meant to trap humidity for the germination of seed, not for rooting cuttings. The point of a mist house is to increase humidity while still allowing for air flow - something that the commonly used domes do not offer.
So, if you are a home gardener with a strong interest in asexual “clonal” propagation, what should you do? The simple answer is build a small mist facility! Which is exactly what my husband did after I left my full-time job at a nursery. Knowing that I "have" to propagate plants, he set out to create a low tech, inexpensive system to incorporate in my home greenhouse, which is also low tech. That is the key here: you do not need to invest thousands of dollars to propagate at home.
My Homegrown Greenhouse
There are a million different backyard greenhouse designs that you can purchase - some that are really beautiful and cost a fortune and others, like mine, that aren’t fancy at all and totally do their job.
We were fortunate to acquire some left-over parts of a greenhouse including bent PVC and metal posts, which David attached to 2x4s and created an 8’ wide by 15’ long “hoop house” which is covered in 50% shade cloth year round. The shade cloth, which we purchased from Gempler's increases the structural integrity by holding everything in place tightly. David constructed this in 2 days back in 2011 and we haven’t done any repairs in the 8 years since!
In the winter, usually around mid-November, we buy a piece of 20’ x 25’ plastic from the paint department at a local box store. With just a few cuts it is the perfect size, and helps hold in heat and keep the space dry so I can overwinter plants with ease. In the spring, as the temps rise, we cut slots in the sides and keep the door open to ensure the space doesn’t get too hot. And finally, when the threat of frost has passed, we remove the plastic and discard. (Though I wish I could recycle that plastic, it isn’t rated for the recycle bin. I try to compensate by reusing plastic pots.)
Inside my greenhouse David built benches so I could maximize the space for plants. In a moment of genius, he decided to not secure the pieces of wood that act as the table top. This is important for two reasons - I can remove them to allow space for tall plants placed on the ground, growing up through the bench, and more importantly I can easily add a plastic cover to create a mist chamber. Before I lose you, let me explain.
Creating a Mist Chamber
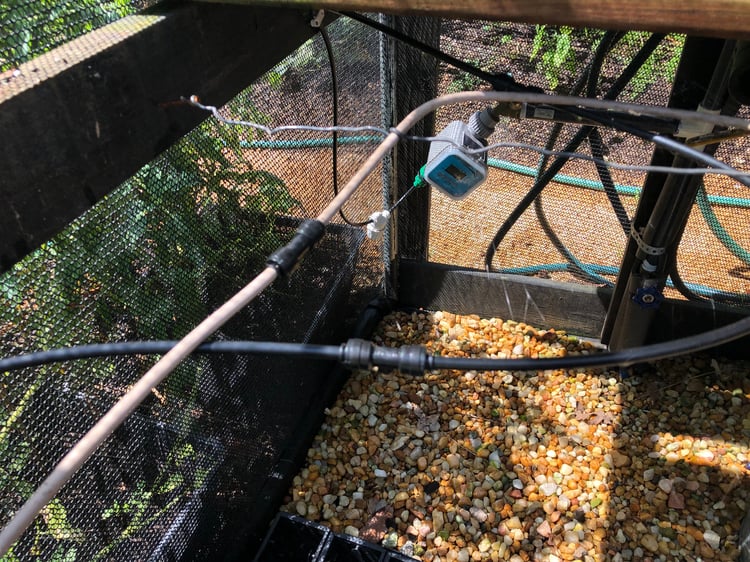
My simple homemade mist chamber: a plastic shower curtain over the greenhouse bench, a repurposed patio umbrella mist hose, and a mist timer.
Over the years as a plant propagator I have learned a few tricks, namely, humidity, temperature and air flow are really important components to getting a plant to root. When you get those three things tuned in you can propagate nearly anything! To achieve the right balance you have to consider first how you are trapping the humidity, then how you are enabling air to flow through which will ultimately lead you to maintaining the right temperature. Just like people, plants don’t thrive in the heat, especially plants with no roots!
In my home mist chamber, we keep it really simple: drape a clear plastic shower curtain over the bench with two ends open. The floor of my greenhouse is pea gravel which drains well but also provides humidity and keeps the floor temperature low. The two open ends allow for natural airflow, so no heat is trapped.
Of course, the most important part of this is the actual mist, which in my case came from modifying a mist hose that was intended to go around a patio umbrella! Yes, you can repurpose simple things that are designed to make our home living experience better to grow plants! This simple $15 hose with attached mist emitters is stretched out and attached under the bench. If you are creating a really large mist chamber you may need to invest in a few and connect them. Of course, you can purchase a traditional mist system from a greenhouse supplier or online sources, but I am certain that will cost more!
Timing is Everything
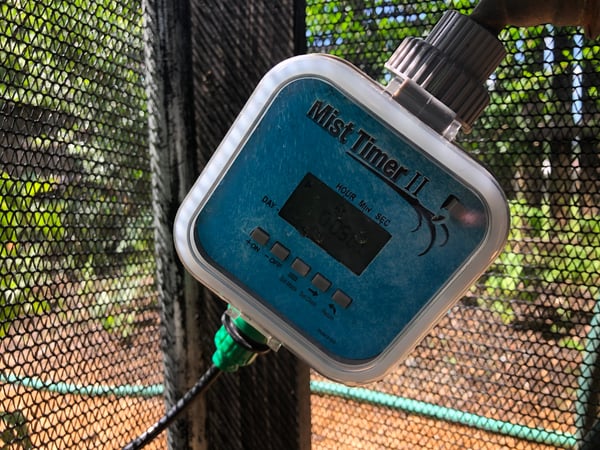
I do recommend investing in a mist timer - they are quite different than traditional irrigation timers.
So far, everything I have described can be done on a shoe string budget. The one exception is the timer. Without a mist timer you will not have as much success with home cutting propagation.
Unlike a traditional irrigation timer used for landscapes or turf grass, a mist timer needs to have many different settings: namely, short but frequent durations of spraying water. For example, your landscape drip irrigation may run for 15 minutes once a day. In contrast, your mist timer will need to run for 5 seconds every 5 minutes from sun up to sun down. The timer you need can be purchased online for under $100, and then you will be set up like a pro! Beware, it is a bit complicated to set up, so watch a YouTube video first! (coming from experience!)
Editors Note: Search for "Mr. Soaker Hose Mist Timer II" for the timer Brie uses and has pictured above. We're not providing a direct link because it seems to come and in out of availability from different vendors.
So, Now What?
Okay, you have built a greenhouse and created a mist chamber, so now it’s time to actually stick some cuttings. Of course, before we get to the really fun part, you have to deal with soil and container selection.
It is very important to use well draining soil - that means LARGE particles, like ground pine bark often sold as “soil conditioner” and perlite, or “the white stuff” that you see in potting mixes. You DO NOT want to use anything that holds excessive water, like peat moss, because that will lead your cuttings to rot.
Professionally I used 60% ground, aged pine bark and 40% perlite mixed together thoroughly as my cuttings media. However, in my home greenhouse, where I can experiment a bit more I have started adding Soil³ humus compost to my mix in small ratios to ensure that when the plants do root they have nutrients available from the start, without me having to add synthetic fertilizer.
So now my recommended home propagation cuttings mix is 60% ground, aged pine bark, 20% perlite, and 20% Soil³ compost. I mix those ingredients together in a wheel barrow and then fill trays with “deep cells” to ensure sharp water movement through the soil profile and enough soil for me to stick a cutting that is several inches tall. Do not press the media in, just lightly tap the tray on the ground to allow the particles to naturally settle with gravity.
Not all Containers are Created Equal
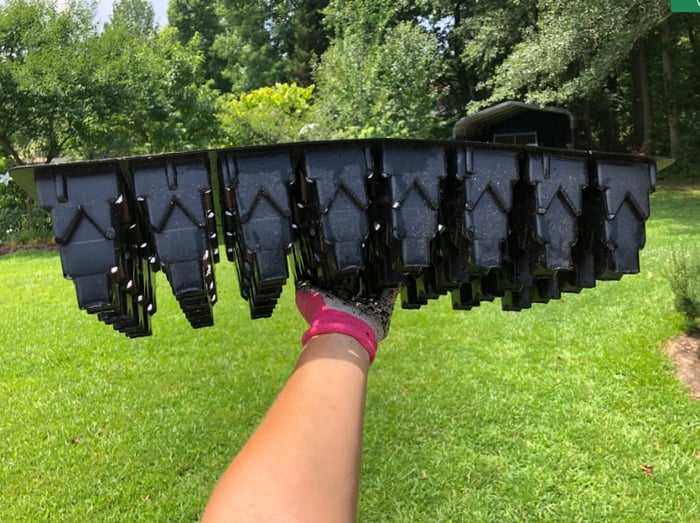
Containers for propagation should be deeper than they are wide to provide good drainage. These are my favorite RootMaker propagation trays.
It can be tempting to stick cuttings in a big pot - BUT PLEASE DO NOT! That is a fast way to get your unrooted plants to rot. The containers that nursery professionals use tend to be deeper than wide, and that is to increase drainage.
My favorite propagation trays are made by the RootMaker company. You may recall me talking about my success in growing tomatoes in RootMaker pots in past blogs and Instagram Takeovers. This is the same product, but designed for asexual production of plants. The design of the tray and the many holes enable the mist water to drain through the media eliminating the potential for the stems to rot before roots are developed.
Finally the Fun Part! Cutting and Sticking
We have covered all the logistics, so it’s time to finally talk about gathering cuttings and sticking them! I wish there was some easy, magic formula that I could advise you on, but the truth is plant propagation from cuttings really is an art form, because great plant propagators just have a sixth sense about when a plant is ready to be stuck. Also, they have stuck hundreds of thousands of cuttings!
Some plants need to be propagated on tender new growth, others are stuck as dormant cuttings. The one general thing: no plants should be flowering when you stick them! You want the energy of the plant to go into root development, not flowering and seed production. So if you want to propagate a plant that is blooming, you have to cut the flowers off. But ideally you will gather the cuttings before the plant initiates buds, because that indicates a change in the chemistry of the plant which can result in difficult to root tissue.
Before I turn you off entirely, let break this concept down into bite-sized pieces. Start by evaluating the type of plants you may be interested in propagating. Think perennial, shrub or tree and the whether the specimen is deciduous, a broad leaf evergreen or conifer. These distinctions will help lead you to defining what plant gets propagated when, and why.
- Flowering Perennials: Herbaceous plants are ones that do not develop a “woody” stalk. Think of tropicals (sometimes called annuals) or flowering perennials that you see in gardens making brilliant displays at different times of the year. Some of the plants in this category can more easily be propagated from seed or division. Others have to be propagated via cuttings. Most often these plants go through a winter dormancy, either retreating to the ground or remaining evergreen but not actively growing. Plants in this category are best produced from cuttings when they are “flushing new growth” meaning their stems are elongating and they haven’t started to flower yet - AKA spring!
- Deciduous Shrubs and Trees: Like the previous category, deciduous shrubs, or woody plants that lose their leaves through the winter, are often grown because of their blooms. Hydrangeas and viburnum are a perfect example. They usually break dormancy in the early spring and will develop leaves and then new growth as the days get long. That is the best time to stick cuttings. You want to look for the new growth or softwood. The best way to understand that is to go out and get up-close and personal. If the tips of the plants are really tender and can break with the pressure of your fingers, its probably to early; if they are really hard with no bindability it's too late. In the southeast, late April to mid-June is the ideal time. Deciduous plants, flowering perennials included, are very forgiving. You can cut their leaves in half and they will keep on growing.
- Broadleaf Evergreens: I am a camellia fanatic, and yes, they fall into this category along with so many of our tried-and-true southern landscape plants like abelia, gardenia, holly and sweet olive. Broadleaf evergreens are often considered shrubs, even though over time they may have the nature of a tree. Unlike deciduous plants, as described above, they require different timing for propagation. Generally I approach this range of plants as mid-summer cuttings. I am still looking at the tips of the branches, but they are much harder than their deciduous counterparts. “New growth, slightly hardened” is the general adage for broadleaf evergreens. Unlike the plants described above you should not cut the leaves but rather remove whole leaves on a cutting, while leaving the top three leaves whole. Typically if a broadleaf plant has leaf damage (like being cut in half) the entire leave will fall off.
- Conifers: This category deserves a blog post in and of itself and is definitely the hardest to grow as a home, or professional propagator in the south. Unlike the plants described above, confers actually prefer cool weather, something we don’t experience a lot of in the southeast. Of course there are exceptions, like the Asian native Cryptomeria and Arborvitae (aka “Green Giant”) which you have seen in every single neighborhood from Atlanta to Raleigh - and beyond. I consider conifers to be plants that are best propagated on hardwood, either in late summer or fall- winter, though there area few exceptions that will root in spring on their new flush of growth. Many conifers do not root from cuttings propagation and are actually grafted, which we are not covering in this discussion. But common varieties of Chamaecyparis, also called Hinoki Cypress, and Cephalotaxus or False Yew are very easily reproduced by means of hardwood cuttings stuck anytime between July and February, especially if you have bottom heat . . . a whole other bag of worms.
- Everything Else: Here is the thing, there are a million exceptions to what I have written about. There are deciduous conifers such as our native Taxodium, and other plants that require being propagated during dormancy with the aid of bottom heat- just a concept that literally means putting heat at the root zone to encourage root development.
Propagation, as I mentioned is an art. It is also an experiment, that you can learn so much from. I encourage you to give it a try and learn as much from your successes as you do from your failures, so don’t get offended if you don’t get 100% rooting - none of us do!
Rooting Hormones
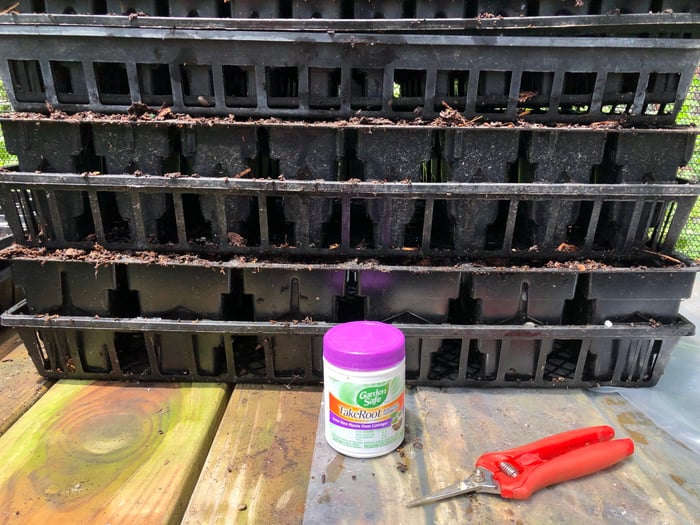
My propagation tools: trays filled with growing medium, growth hormone, and good pruners. Ready to start making more plants!
In case you were wondering, yes, rooting hormones are also a part of this propagation method. Rooting hormones, specifically Auxin, or indole-3-acetic acid “IAA”, is a naturally occurring growth regulator that plants produce. The function of auxin is to stimulate cell length and return the cells of stems and leaves to "square one", so to speak, so that they can become roots.
Through modern chemistry two synthetic auxins, indole-3-butyric acid ("IBA") and naphthaleneacetic acid ("NAA") have proven to be most effective in stimulating root growth and are the standard active ingredients in commercial rooting hormones. They come in both liquid and powder forms and vary in strengths.
For home propagators I recommend a powder form of IBA, such as Garden Safe TakeRoot, commonly sold at garden centers and even box stores. This product is easy to use and is unlikely to burn the soft, unrooted tissue of your cutting, compared to liquid formulations that have to be diluted for specific strengths.
You also do not need to score or wound the bottom of the cutting when using powder hormone. That is a technique specifically for hardwood cuttings to make more cells absorb the hormone to stimulate vigorous rooting. As a professional I used both - powder hormone for all my spring, soft wood cuttings and liquid for my mid-summer semi-hardwood and winter hardwood cuttings.
Take Cuttings from Your Plants
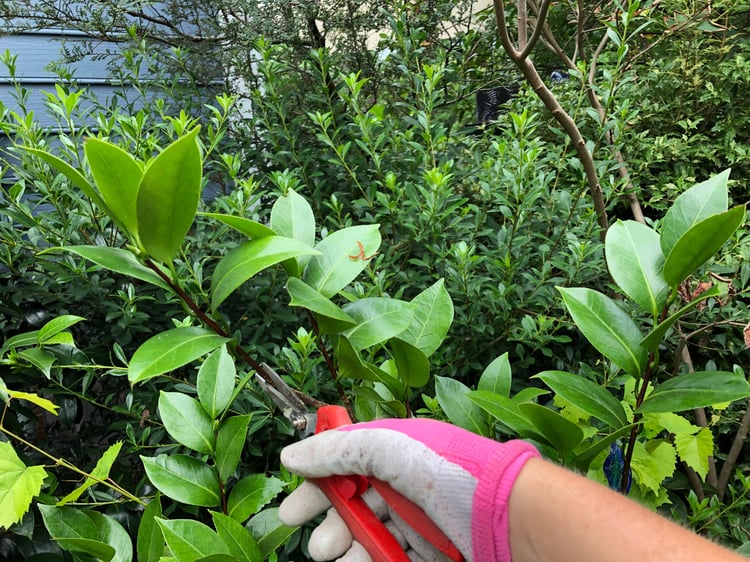
Take cuttings from the tip of a branch with 3-7 leaves. Cuttings should be not too small, not too big... just right!
Size really does matter when it comes to cuttings. You know how in Goldilocks and the Three Bears the medium size was always "just right?" Well that is basically true of cuttings, too. If you are trying to stick a piece that is too small, likely it won’t make it. And if you are attempting to propagate a giant branch, you will likely also find that your success rate will be very low. This is again one of those things that with some practice you become better at.
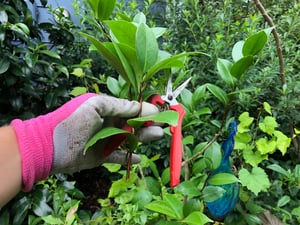
The easiest tissue to propagate via cuttings is tip growth - meaning the top of a branch. Ideally you will be able to get a piece that has 3-7 leaves on it (more if the leaves are very small). With sharp pruners (my favorite are Okastune) snip the cutting off the parent plant and immediately put it in water, or at least a dark, damp environment until you can get back to your mist house. You want to focus on gathering healthy new growth, free from insects or any leaf deformities.
The reason I indicate 3-7 leaves is because that is pretty easy to identify. Also, the ideal cutting has 5 leaves - 2 lower ones that will be removed and 3 top ones that will capture energy through photosynthesis, thus keeping the plant alive until roots are established. Obviously not every cutting you stick will fit exactly into this criteria, but if you aim for this your rooting percentages will be high. I mentioned the idea of cutting leaves in half earlier, which is sometimes necessary, especially when a plant has very large foliage. But, when possible, it is best to keep them intact, and instead remove whole leaves.
Clean Your Pruners
To avoid the potential of spreading disease, clean your pruners by spraying rubbing alcohol on them and lighting the blade on fire with a lighter. This is especially important if you are gathering from multiple plants, like camellias, that may have viruses which cause variegation. (Yes, people have purposely exposed camellias to a virus just to get marbled colored flowers.)
Ready for Sticking
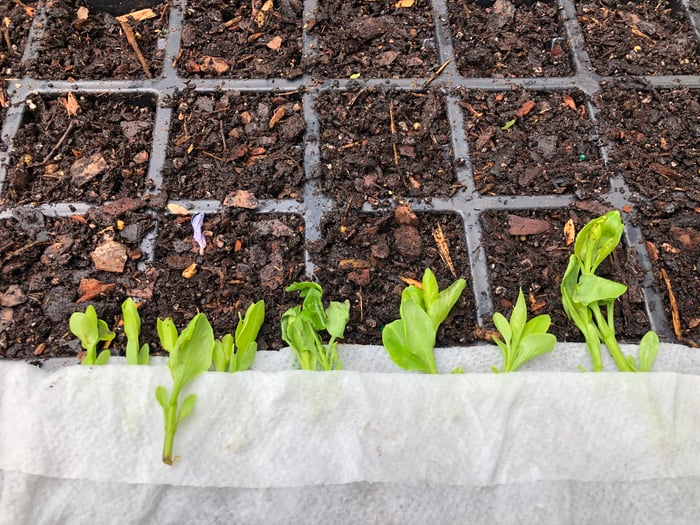
If you can't plant them right away, you can store your cuttings wrapped in damp paper towels in the fridge for up to 3 days.
Once you have gathered your cuttings you can refrigerate them wrapped in damp paper towels in bags for up to 3 days or stick immediately to ensure they won’t dry out. The actual sticking process is quite easy. Simply remove the bottom two leaves, dip into hormone (poured into a separate container) and stick the cutting into your soil.
The reason you need to have two lower leaves removed is to expose the nodes, which is the spot where the leaves were attached to the stem. Nodes can also possess cells that turn into flower buds, or in this case, roots! If you stick just a stem without exposing the nodes your chances of rooting are significantly less.
It is also important to not compact the soil when you are filling your tray or when you are sticking the cutting. Always remember the roots of a plant live in the air space between soil particles. When you compress the soil you reduce the air space and make rooting more difficult. Gently stick the cutting into the soil and lightly press the stem in to ensure that it is sturdy and that the propagation media is in good contact with the stalk.
Once you have your cuttings stuck, place the tray into your mist chamber and make sure your timer is working. Unrooted cuttings can collapse in a matter of minutes if they dry out, especially in the heat of the summer. Check them daily, to make sure they are not wilting.
Patience is a Virtue
Over the next few weeks you are going to be tempted to tug on your cuttings to see if they have rooted - DO NOT DO THAT! The more you disturb the cuttings the more chance you have of breaking off the newly formed roots. The best advice I can offer is leave them alone!
You will be able to tell when your cuttings have rooted because they will begin to push new growth. Also, roots will frequently grow out of the bottom of your container. That’s when you know you have success as a propagator and it is time to move them to a shady, easy to water space outside of your mist chamber.
It is best to pot up rooted cuttings after they have firmly established themselves in your pot. You are better to leave them in your propagation tray than pot them up too early as the loose, well-draining propagation media can crumble off exposing the roots and making the potting process tedious. Some plants, like camellias are best propagated in mid-summer and left alone until the following spring. Others, such as hydrangea, can be propagated in spring and potted by late summer. The key lessons are - every plant is different and be patient!
HAVE FUN!
Home propagation is a very rewarding experience and it’s something I wish more people would try. I hope you have learned some new techniques from this longer-than-usual blog post and will be inspired to try your hand at making more plants, like me!
Start with something easy like a coleus and graduate to more advanced plants that you love to grow. At the very least, these experiments will lead you to a new appreciation for all the plants you can buy and for all the hard working nursery professionals around the globe!


Did this help you out? Have any questions for clarity? Leave a comment below!